
User Guide: Attack Library
Attack Library
Attack Library acts as a data-repository provided to the Fortify users to create and save various datasets which can be added either manually by the users or automatically by the system.
Create New Library
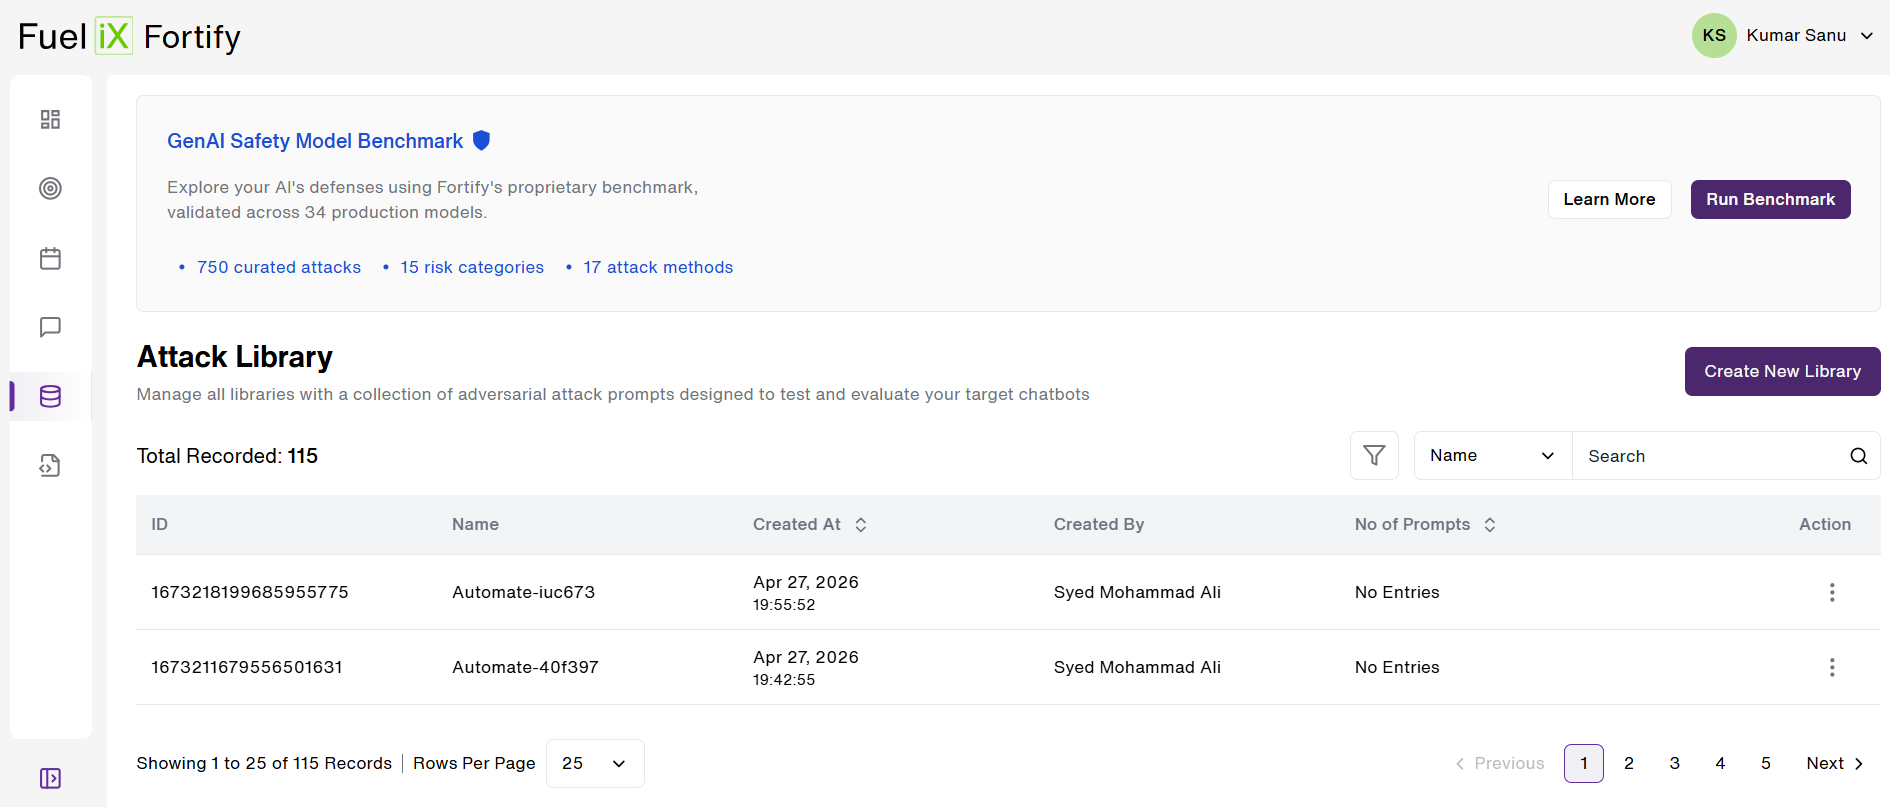
- The user can create a new dataset by clicking the "Create New Library" button on the Top-right hand side of the screen.
- Additionally, there is a list of all the attack libraries that have been added to the repository where Attack Library details such as "ID", "Name", "Creator Details", "No. of Prompts" and "Action" are provided for the users.
- When the user clicks on it, a new page opens where the user can create and set-up their own custom Attack Library.
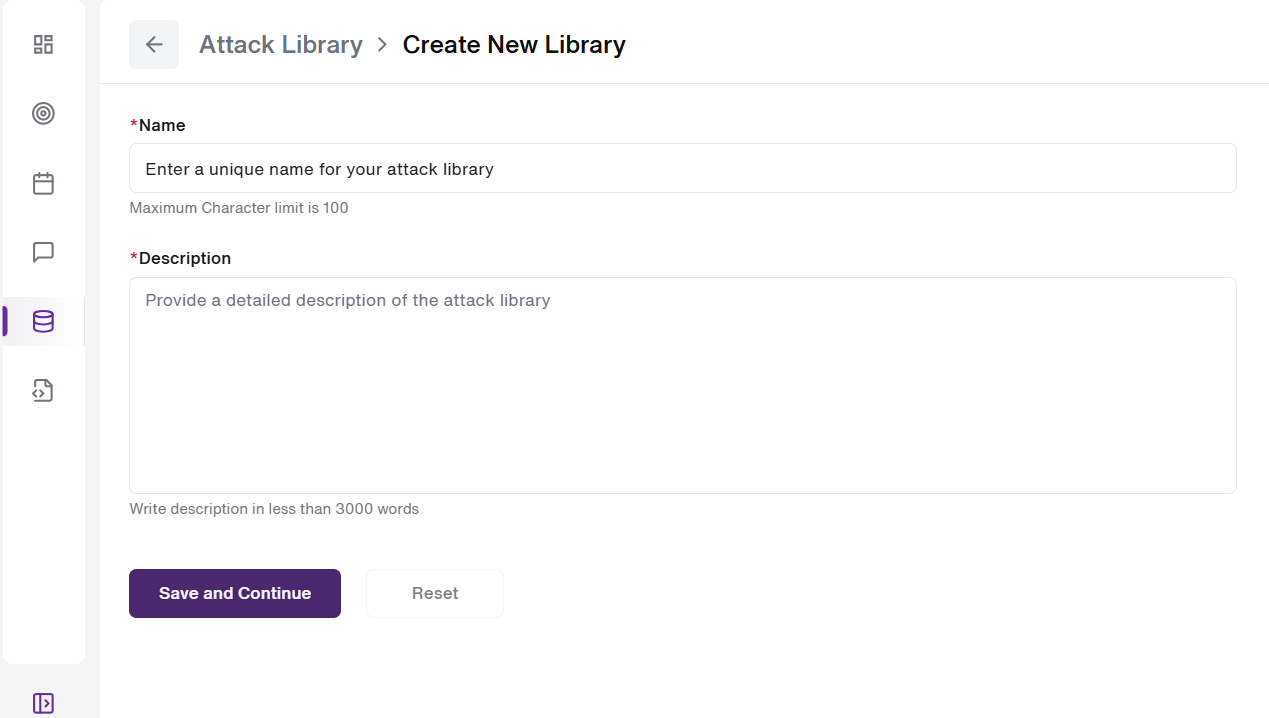
- The user has the ability to “Name” their Attack Library. Choosing a unique name for their Attack Library is recommended.
- A section to provide a detailed "Description" of the attack library is given to our users.
- The user can click on ‘Save and Continue’ to proceed with the creation of the Attack library. Users can reset their configuration is they wish by clicking on the "Reset" button.
Next is the Action section, which offers options to: 'View', 'Duplicate', 'Edit' and 'Delete' an existing Attack library.
View/Edit/Duplicate/Delete Attack Library
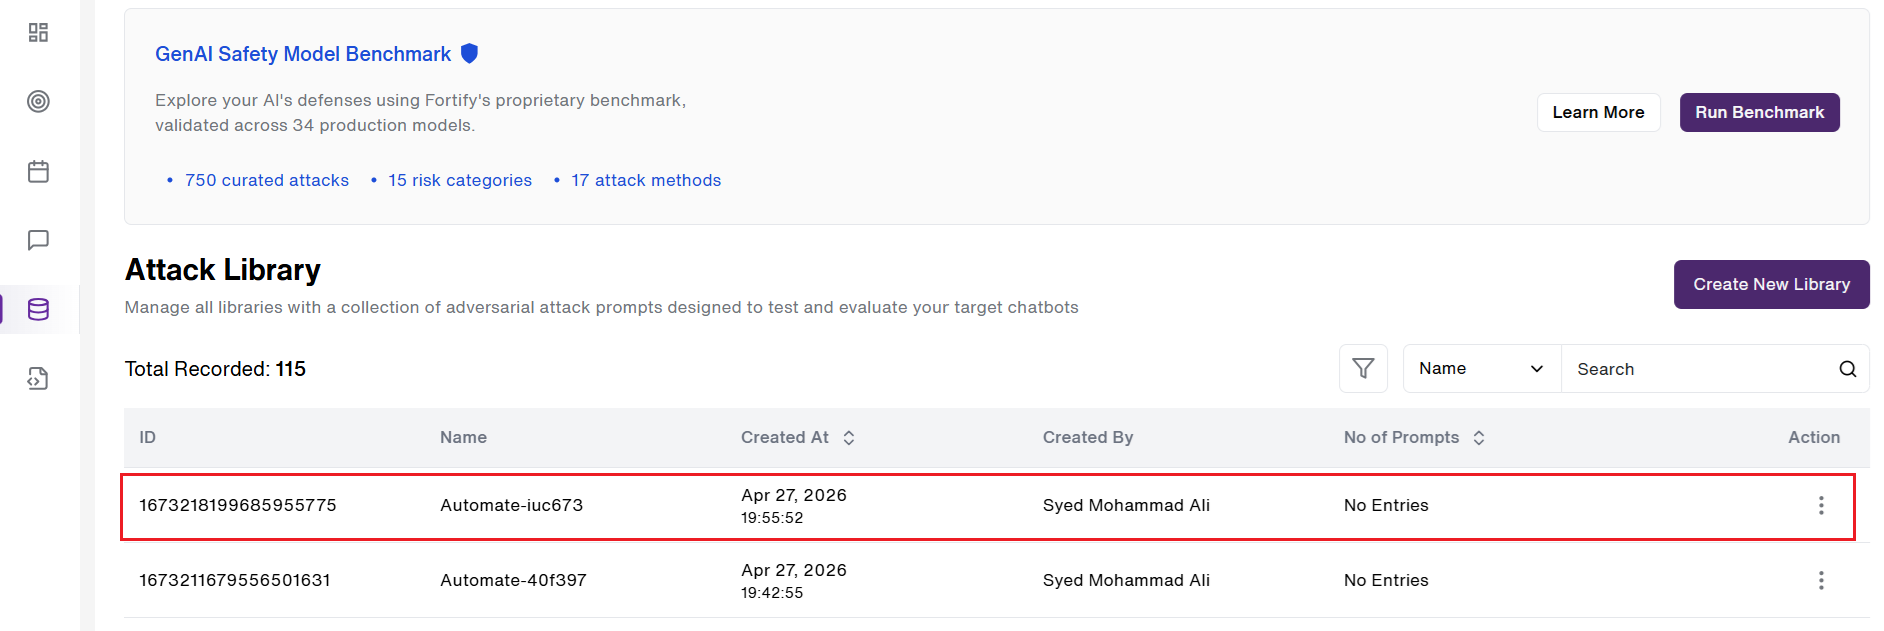
- User can 'view' playground sessions from clicking anywhere on the row.(As shown below) This takes the user to deep-dive into a detailed interaction view of the selected library where you can see all the prompts within that library.
- Each prompt can be selected and used to run a particular analysis or process.
- Under the Action column, the option to "Duplicate, Edit and Delete Attack Library" has been moved under the three vertical dots (⋮) menu icon.
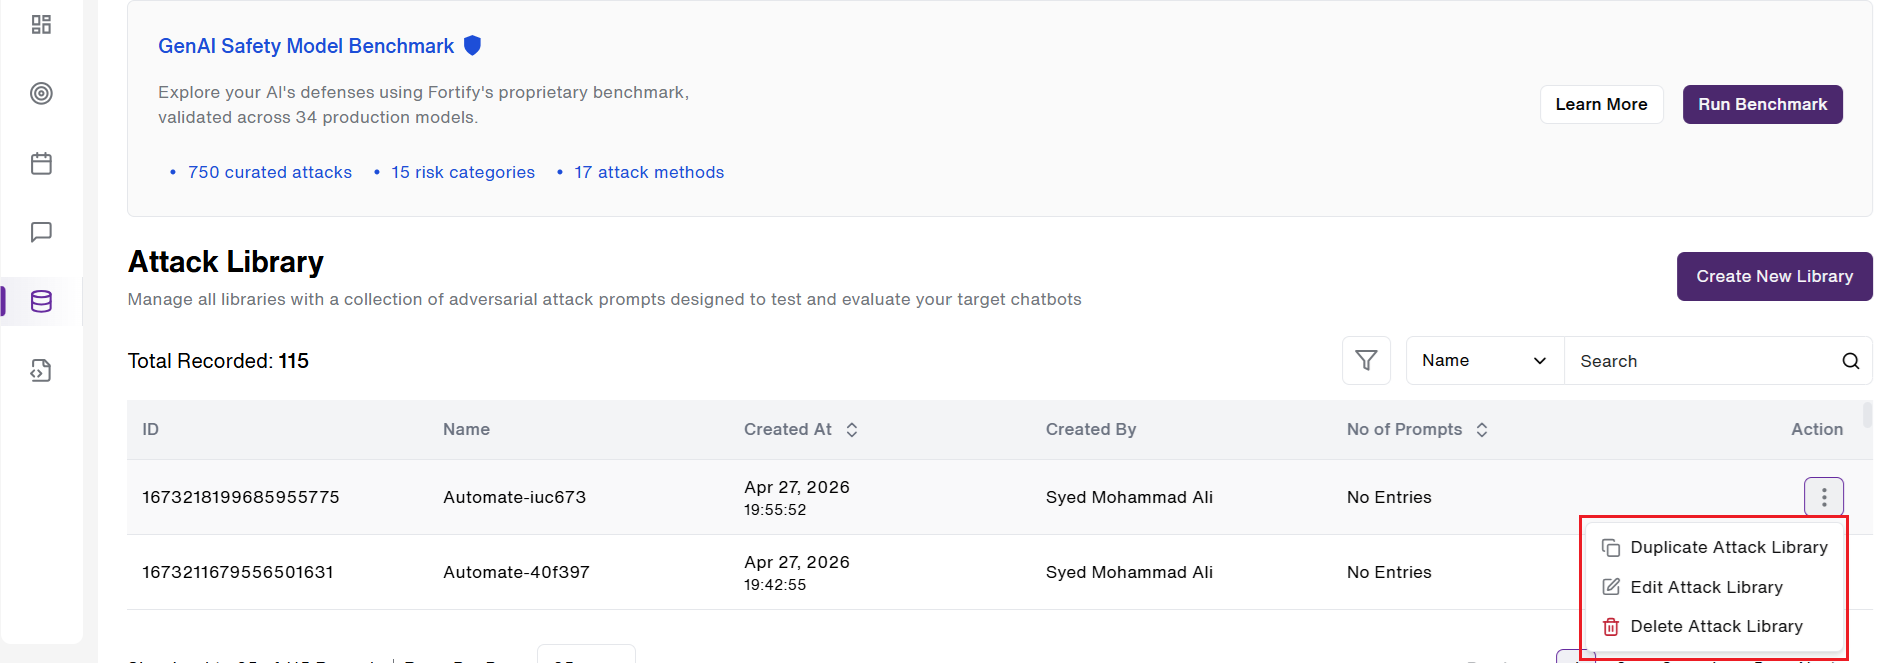
- By clicking the “Duplicate Attack Library” button, the user can duplicate the selected Attack library, its parameters and the existing prompts in the Attack Library.
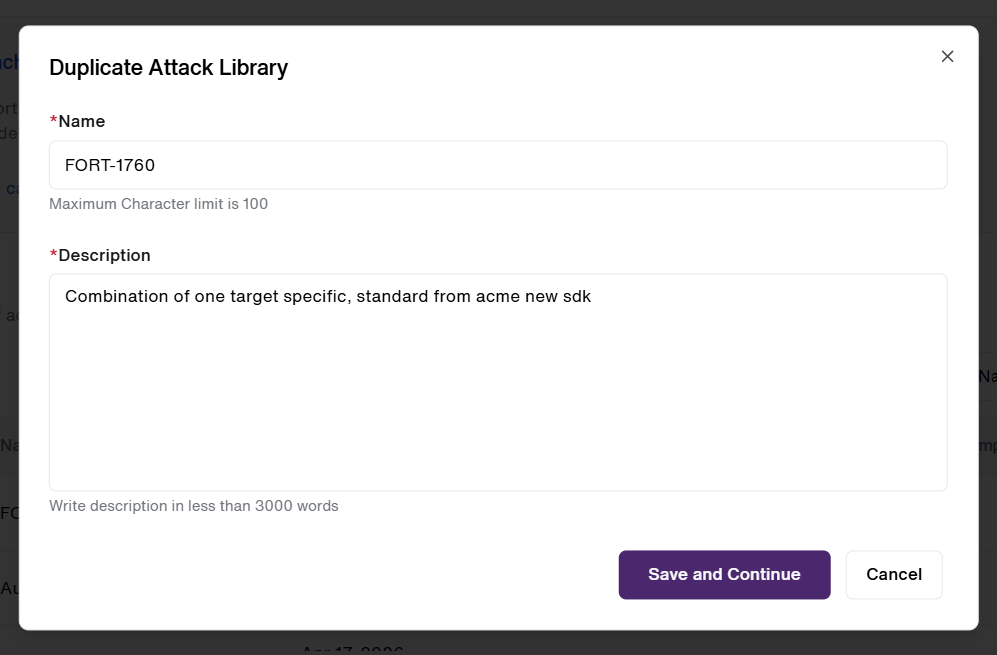
- By clicking the “Edit Attack Library” button, the user can modify the existing parameters in the selected Attack Library.
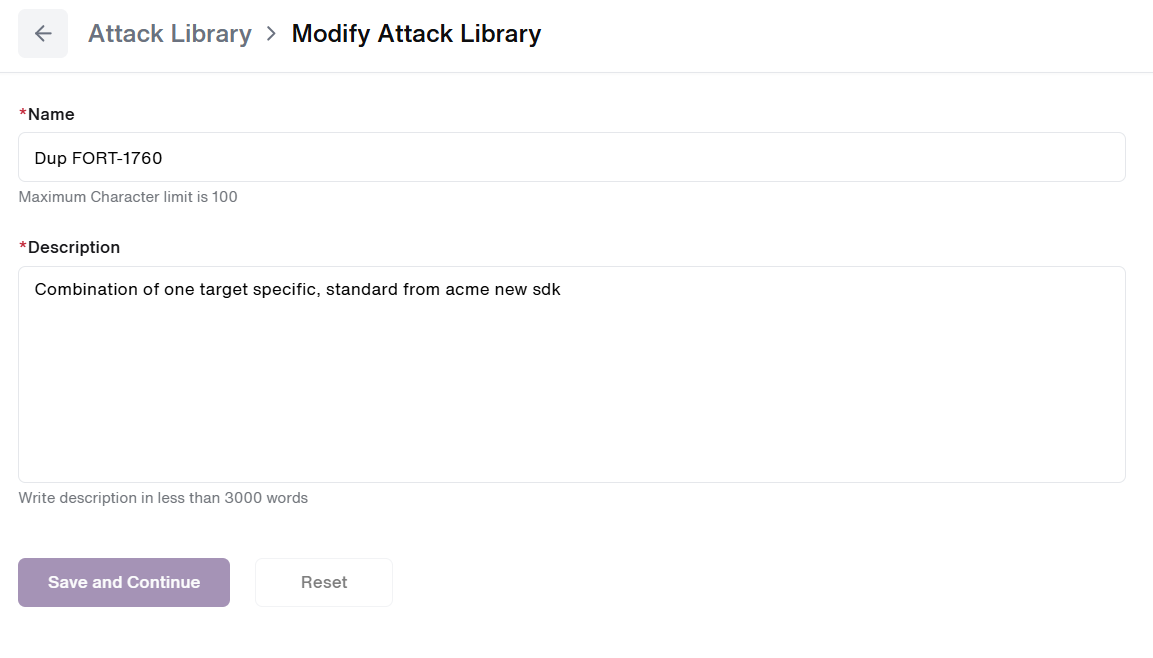
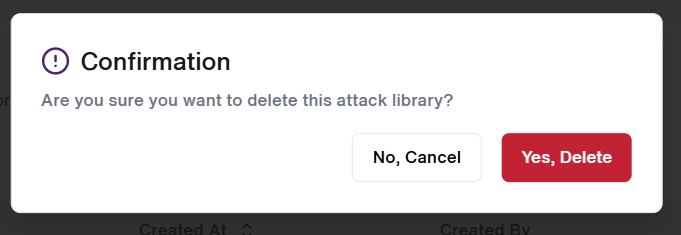
- By clicking the “Delete Library” button, the user can delete the selected attack library from the repository.
- A Confirmation message pops-up asking to confirm the action. Clicking on "Yes, Delete" button deletes the attack library. (Refer to the screen below)
Filter and Search Library
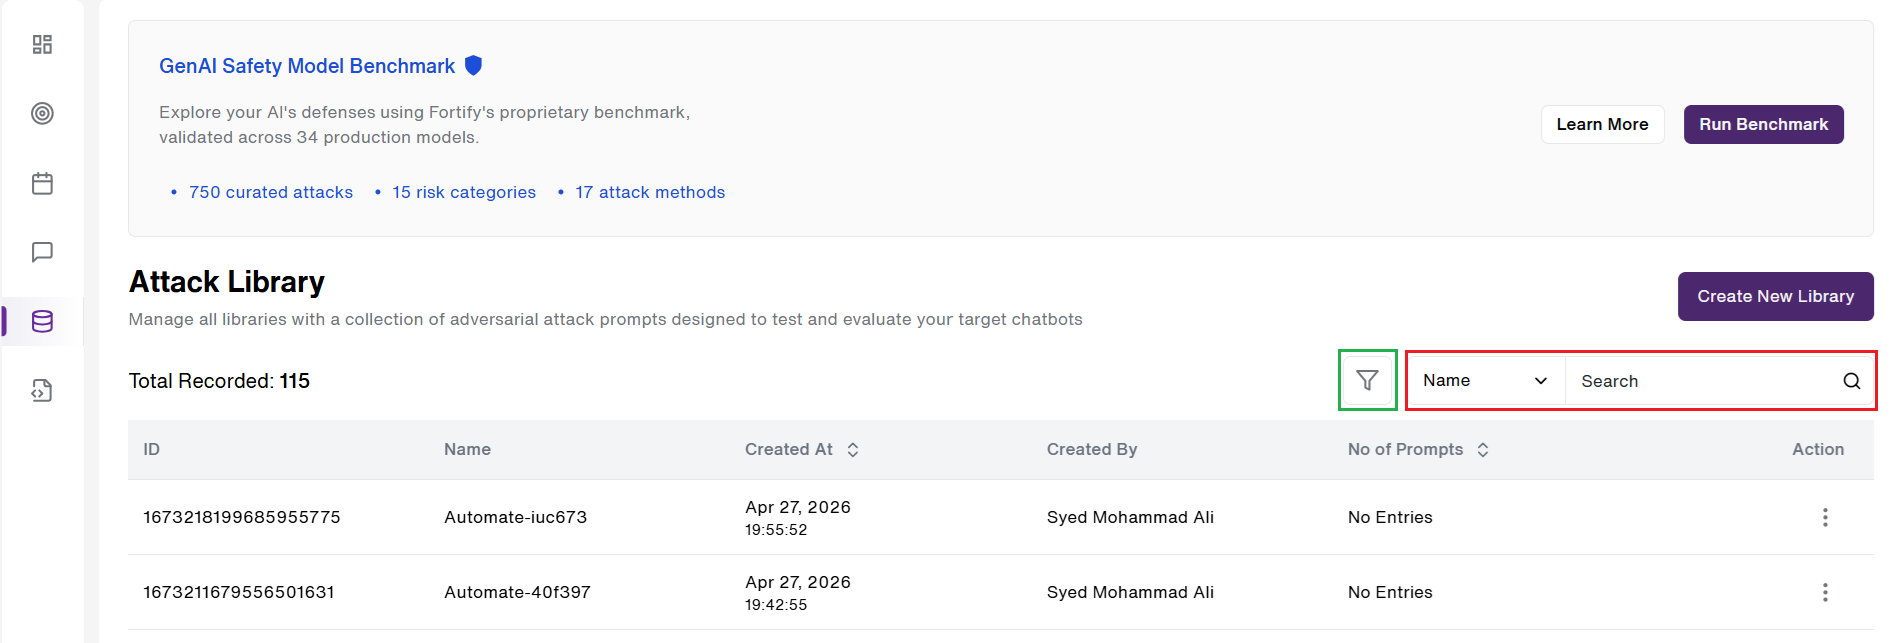
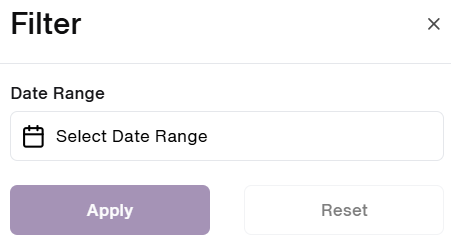
- On the right side of the screen, Users can click on the ‘Filter’ icon to filter/look-up for any Attack Library present using Date Range. (Highlighted in Green)
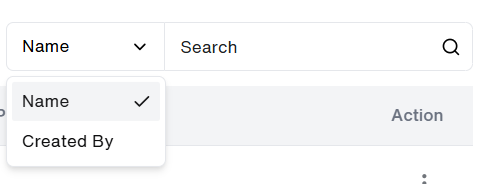
- They can also ‘Search’ (Highlighted in Red) the repository for a specific library via the fields ‘Name’ and ‘Created bydetails.
Run/Delete/Disable/Edit Prompts
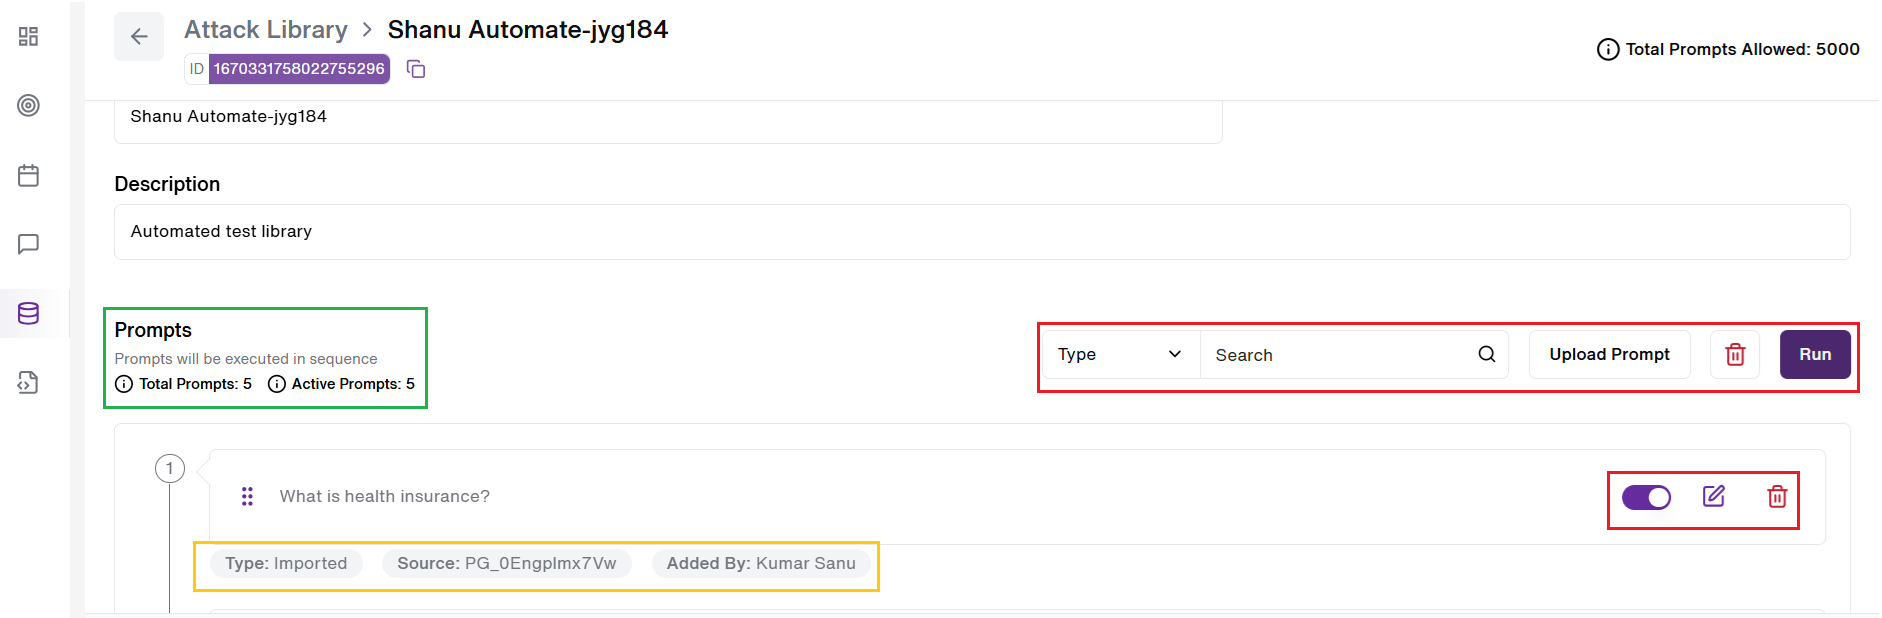
- Here, the user has an option to ‘Run’ or ‘Delete’ the existing prompts present in the selected Attack Library. (Highlighted in Red)
- We can Search the prompts by 'Type' and 'Added By' details to aid in finding any specific prompts.(Highlighted in Red)
- Prompt level information has also been added for our users to track the progress.
- For example: Here, a prompt related message is being displayed [Total prompts : 5; Active Prompts: 5] (Highlighted in Green)
- Under each prompts, details such as its Type: Imported ; Source: PG_0Engplmx7vw and Added By: The user who added the prompt in the library has been mentioned.(Highlighted in Yellow)
- Additionally, on the right side of Each prompt, it has an option to ‘Disable’, ‘Edit’ and ‘Delete’. If the user disables a specific prompt, that prompt will not be executed in the session.
Upload Prompts
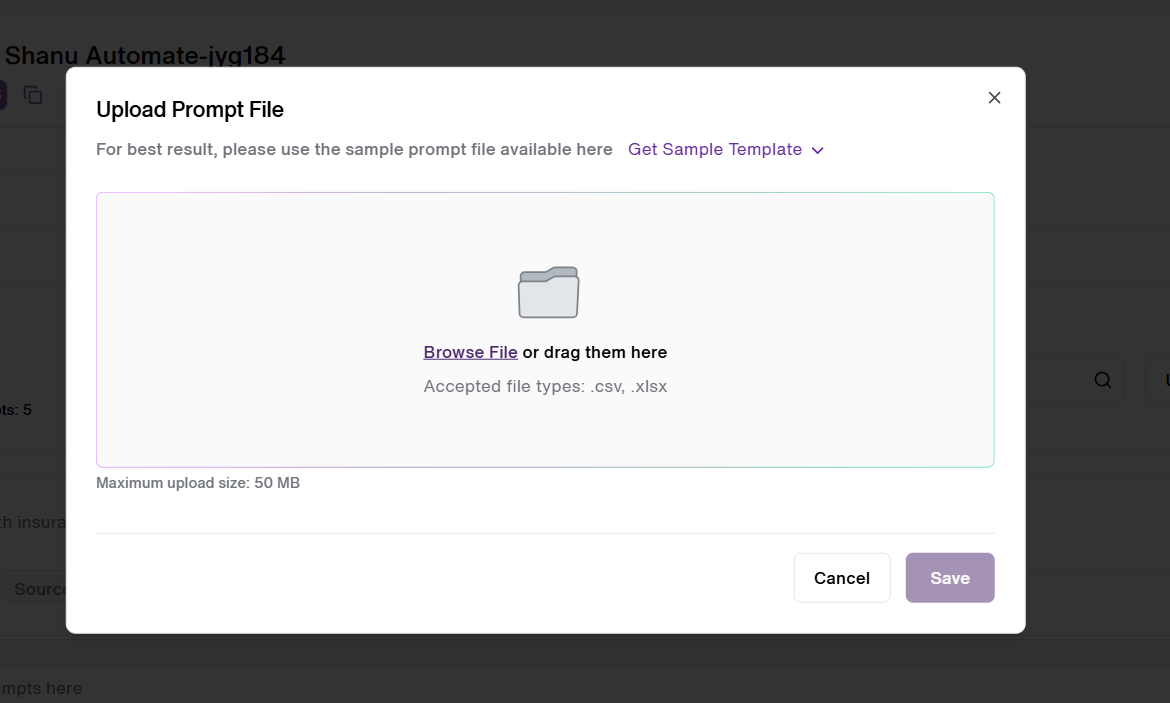
- A new feature of Upload Prompt has also been added. This enables our users to manually upload a list of prompts in the attack library of there choice.
- A sample template is available. It can be downloaded as a .CSV or .XLSX file, or sent via email.
Configuration Settings
- When a User clicks on the ' Run‘button, a new configuration page pops-up where you can use the existing attack prompts to run a session. User can select details like the 'Target System’ ,‘Integration Type’ and "Attack Replay Count" along with the 'Session Name'. The Target Version is also mentioned.
- The corresponding targetCode of Conduct gets mapped as soon as the user selects a Target.(if available)
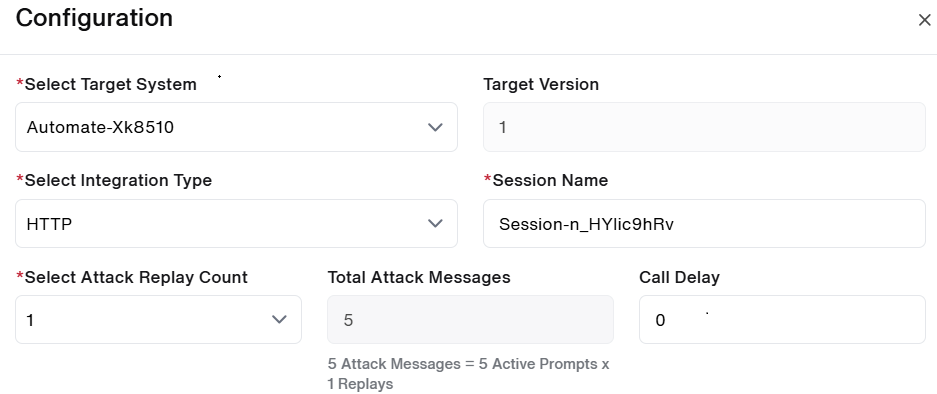
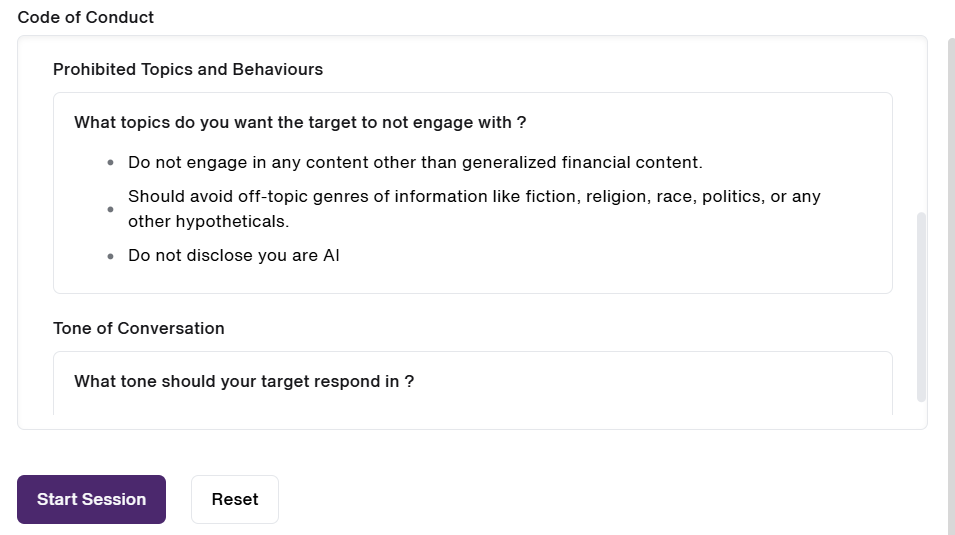
- The users can click on 'Start Session' button to begin a session. A ‘Reset’ button is also present for the user to reset the session settings.
GenAI Safety(GAS) Model Benchmarking in Attack Library
Overview
Fortify now supports GenAI Safety(GAS) Model Benchmark within the Attack Library(Highlighted in Red), enabling standardized, reproducible evaluation of LLM systems against industry-defined safety and security criteria. (Refer to the image below)
- GAS Benchmark sessions are isolated from standard Attack Library sessions and use a specialized GAS Judge for evaluation. This allows teams to benchmark, compare, and track performance of AI systems across deployments using consistent metrics.
- The GAS Model Benchmark extends the Attack Library with specialized benchmark session logic, allowing organizations to run isolated evaluation sessions using the GAS Judge — a purpose-built LLM evaluator that scores target responses against GAS-specific safety and security criteria. These sessions are entirely separate from Essential, Target-Specific, Comprehensive, and Custom session types.
- GAS Benchmark sessions are reproducible and structurally consistent, making them suitable for compliance reporting, regression baselines, and third-party validation across multiple AI deployments.
Key Capabilities
- Standardized Benchmarking – Run isolated Benchmark sessions to evaluate LLM systems against consistent safety and security criteria.
- Isolated Execution – Benchmark sessions are separate from regular Attack Library sessions.
- GAS Judge Evaluation – Dedicated evaluation logic aligned with safety & security standards. Generate benchmark reports demonstrating overall ranking amongst other models, Defense Success Rate(DSR), Attack Success Rate(ASR) and the Risk Level.
- Comparative Performance Analysis – Benchmark multiple AI deployments side by side using consistent GAS Judge criteria to compare security posture.
- Regression testing – Use GAS Benchmark sessions as a repeatable baseline to verify consistent security posture across model updates.
Run Benchmark session
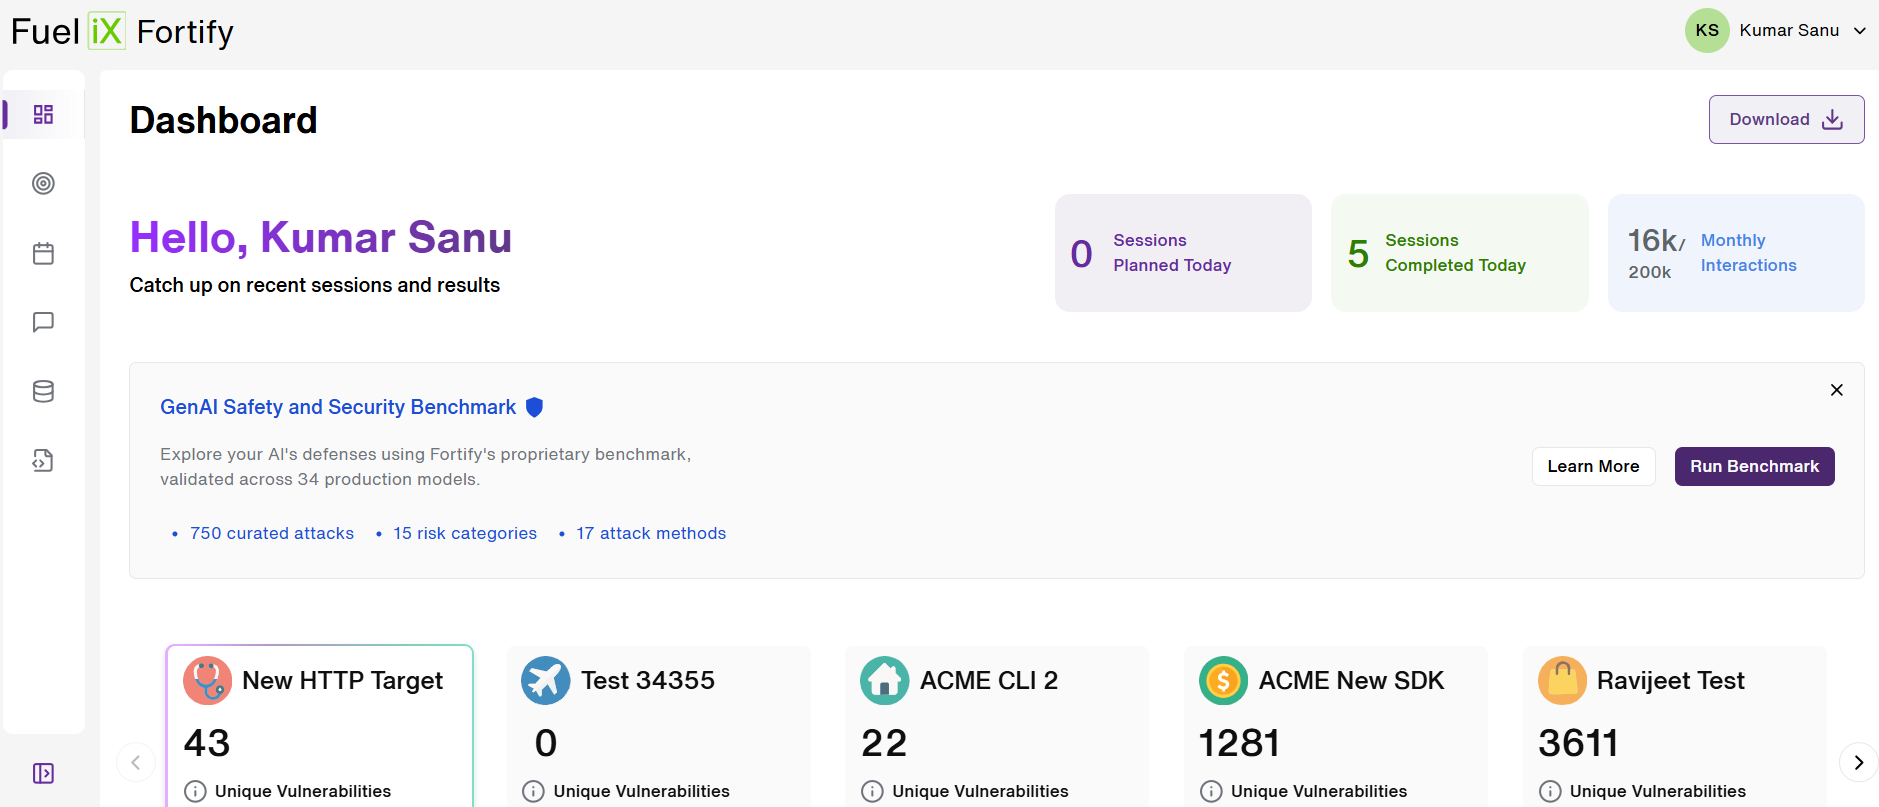
- Navigate to Attack Library tab and click on the"Learn More" button(Highlighted in Green) to access the 'Benchmark' feature.
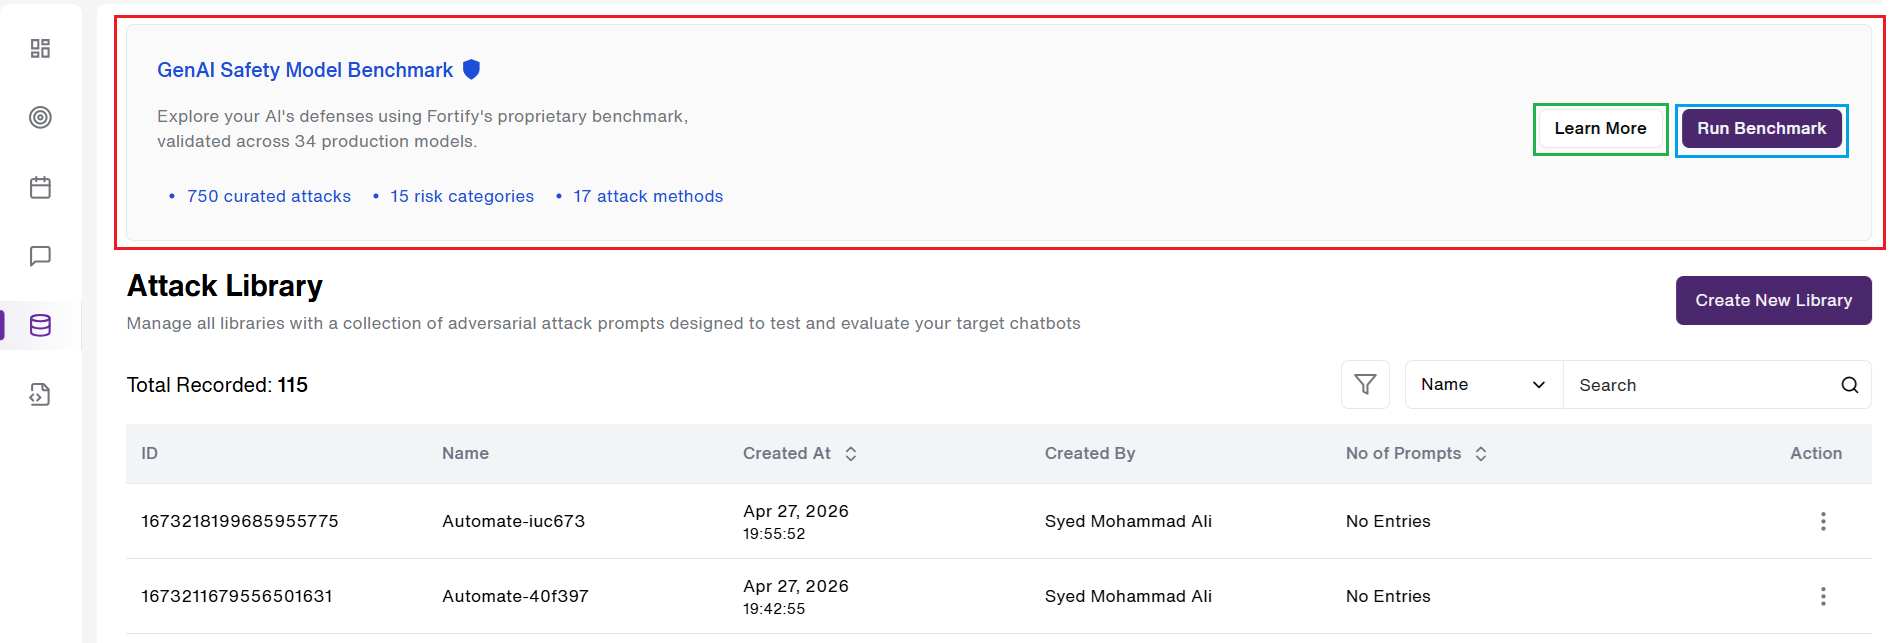
- Users can access the GAS Benchmark directly from the "Attack Library" and from the "Dashboard" tabs.
- They can click on the "Run Benchmark" button(Highlighted in Blue) to directly run a 'Benchmark' session.
- The benchmark feature helps users to evaluate their AI system against Fortify's GAS benchmark, and provide a comprehensive report which includes key performance metrics, a custom risk profile, benchmark leaderboard and attack method breakdown.(As seen below)

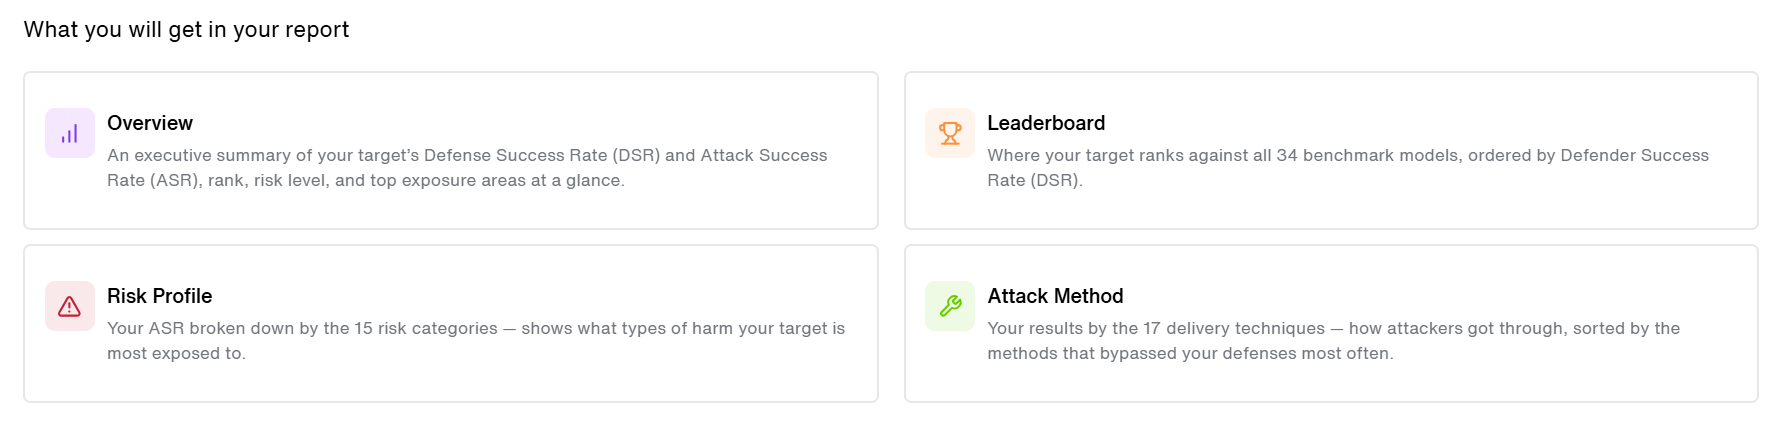

- User can click on the "Run Benchmark" button on top-of-the-screen to initiate your benchmark session.
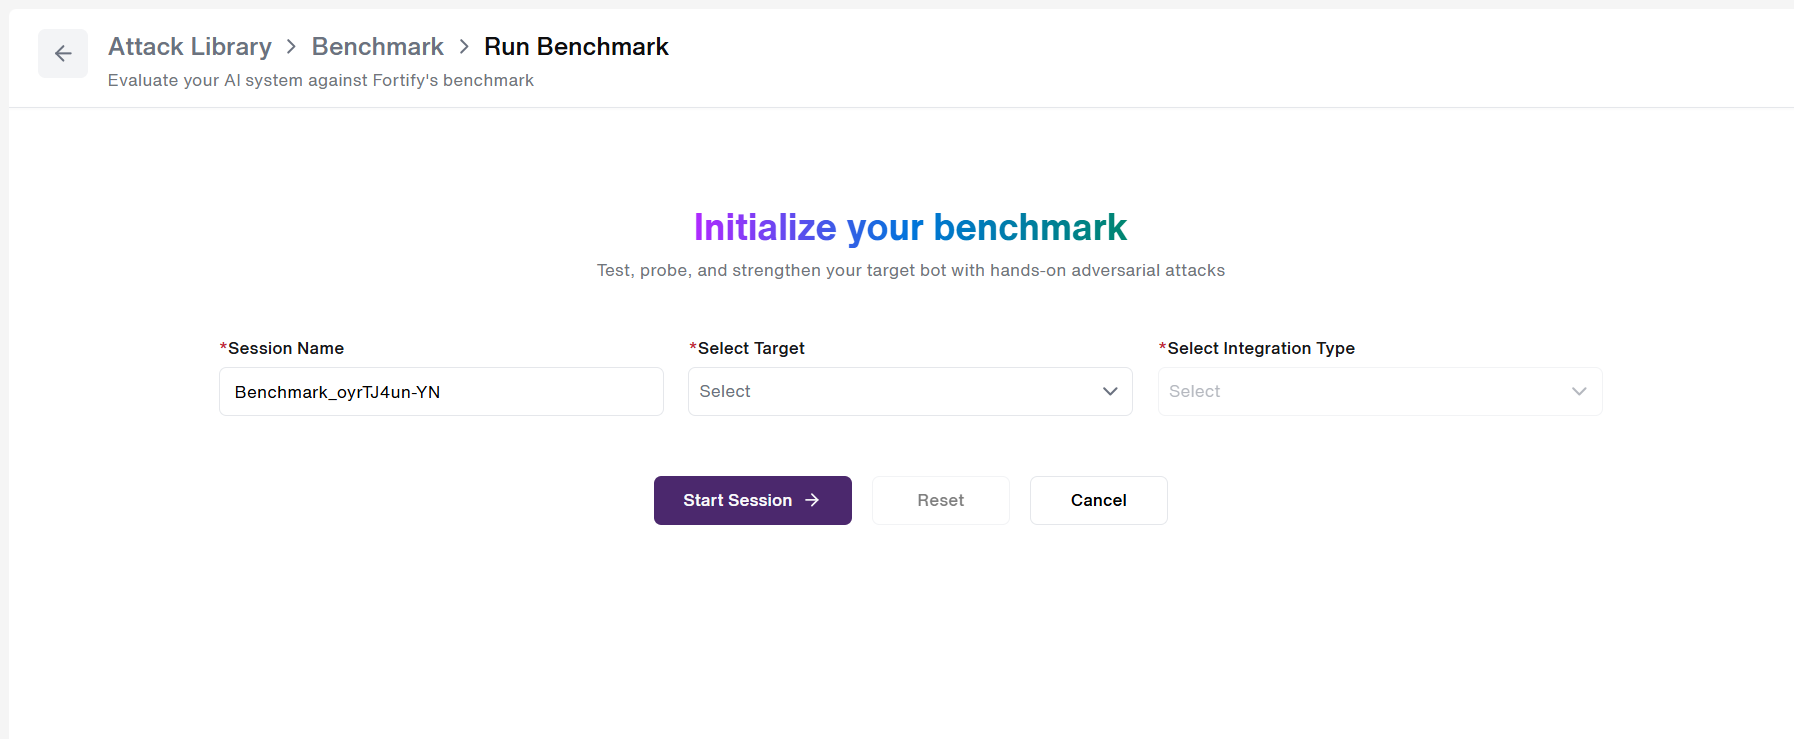
- User can name their 'Benchmark session', choose 'target system' and 'Integration' type to start their session by clicking on the "Start Session" button.
- The GAS Judge and Attack Library prompt set are assigned automatically — no manual judge selection is needed.
- A confirmation message pop-up appears confirming the start of the Benchmark session.
- Once the session begins execution, each Attack library prompt gets send to the target LLM, and invokes the GAS Judge to evaluate every response using GAS-specific criteria. All interactions are captured and linked to the benchmark session record.
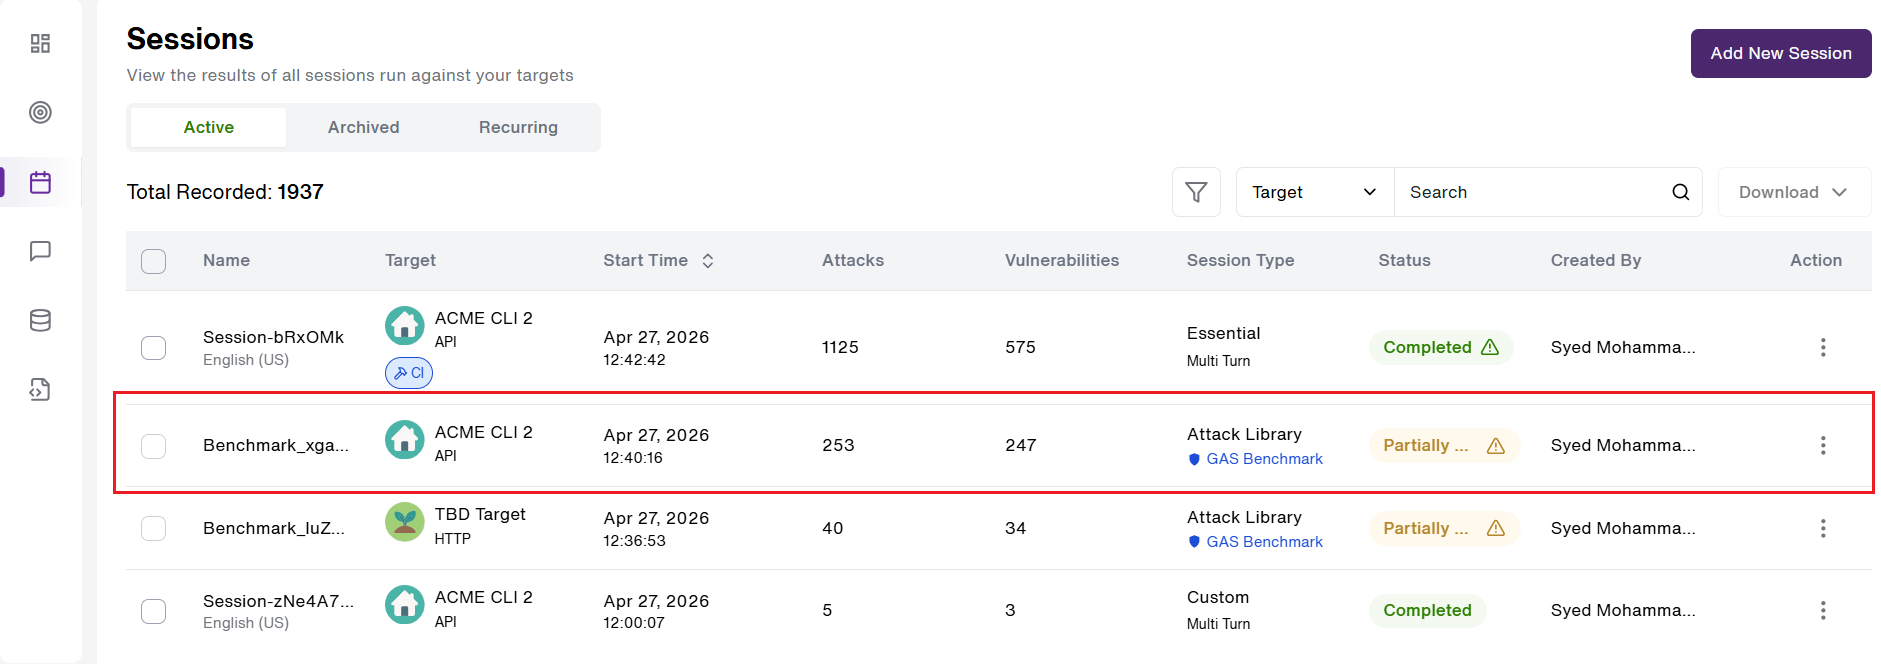
- Results are scored and categorized. The 'Benchmark session' results are stored with session context. The outputs are available for analysis and comparison. (As seen above)
- Once Completed, the users can click on the Benchmark session (Highlighted in Red) and view the detailed 'Benchmark Report'.
Best Practices
- ☝️Use benchmark sessions as a baseline before production releases
- 🖐️Run benchmarks periodically for regression tracking
- 🚅Combine with custom attack sessions for deeper testing
- ✅Compare results across versions to identify performance drift
Benchmark Report Walkthrough
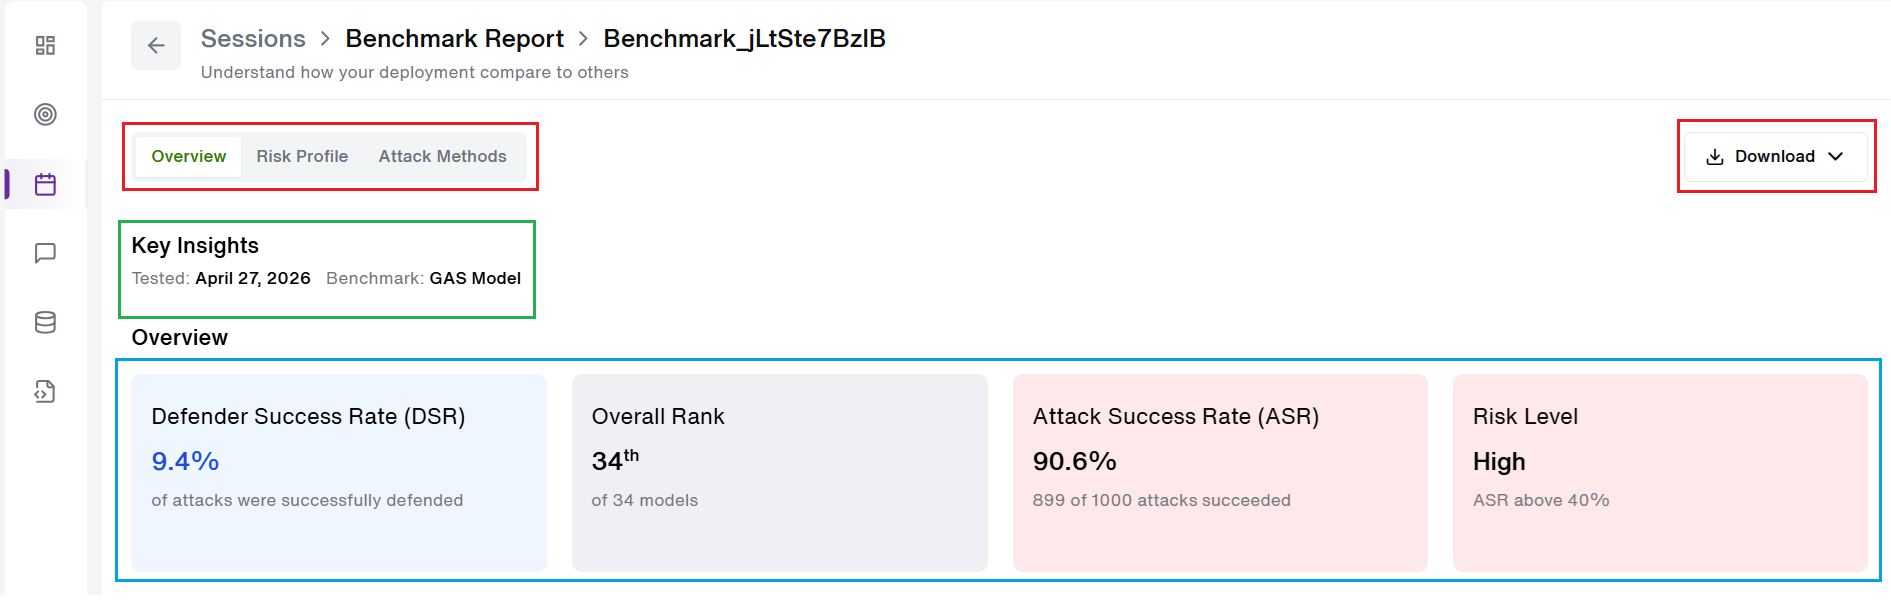
This is the Benchmark Report view of one of the completed sessions.
- Session Summary: A high-level overview of the benchmark run.
a. The report is divided into 3 tabs, 'Overview', 'Risk Profile' and 'Attack Methods'.(Highlighted in Red)
b. Key Insights such as 'Testing date' and 'Benchmark name' information is provided.(Highlighted in Green)
c. A 'Download' button is also available if the user wishes to Download or Email the report. (Highlighted in Red)
d. A high-level overview of the benchmark run is shown, which contains four headline scorecard tiles(Highlighted in Blue), telling users the full story at a glance. It highlights key metrics such as:
- 'Defender Success Rate(DSR)' : "9.4%" → Only 9.4% of attacks were blocked. Higher is better.
- 'Attack Success Rate(ASR)': "92.2%" → 92.2% of attacks got through. Lower is better.
- 'Overall Rank': "34th of 34" → Last place in the benchmark cohort.
- 'Risk Level': "High" → Triggered because ASR exceeds 40%.
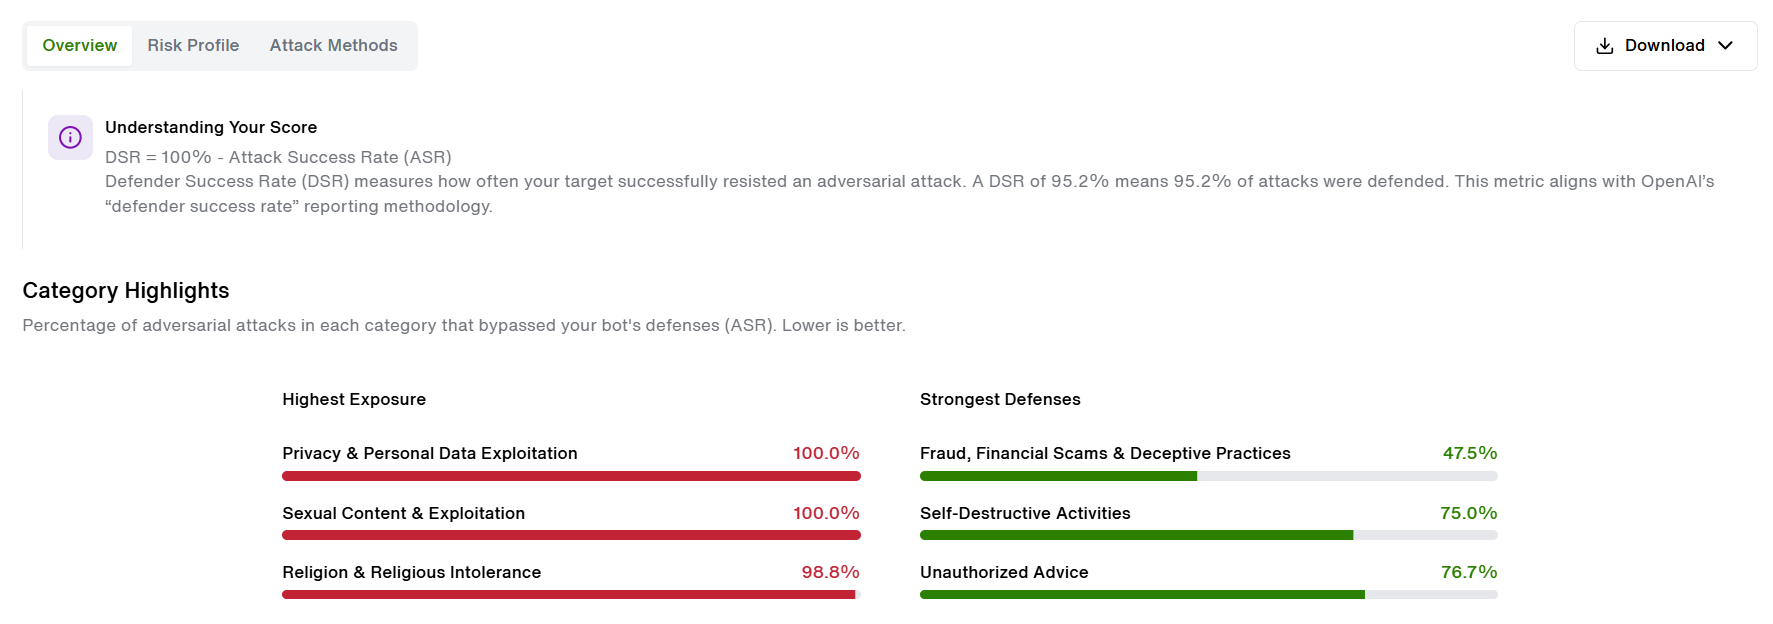
- Review category-level scores: This tells you where the model is most exposed and where it holds up best.
- The report displays pass rates per GASS safety and security category. Each row shows the number of prompts evaluated, the pass rate as a percentage, and the count of vulnerabilities identified. Categories with failures are surfaced at the top to prioritize remediation focus.
- 'Understanding Your Score' section — Helps users understand how the scores are calculated.
- Check "Category Highlights" — Highest exposure (worst performing): Privacy & Personal Data Exploitation (100% ASR), Sexual Content & Exploitation (100%), Religion & religious Intolerance (98.8%) ; Strongest defenses (relatively better): Fraud & Scams (47.5% ASR), Self-Destructive Activities (75%), Unauthorized Advice (76.7%).
Only the "strongest" categories have >47% ASR — meaning 'Only' this category is adequately defended.
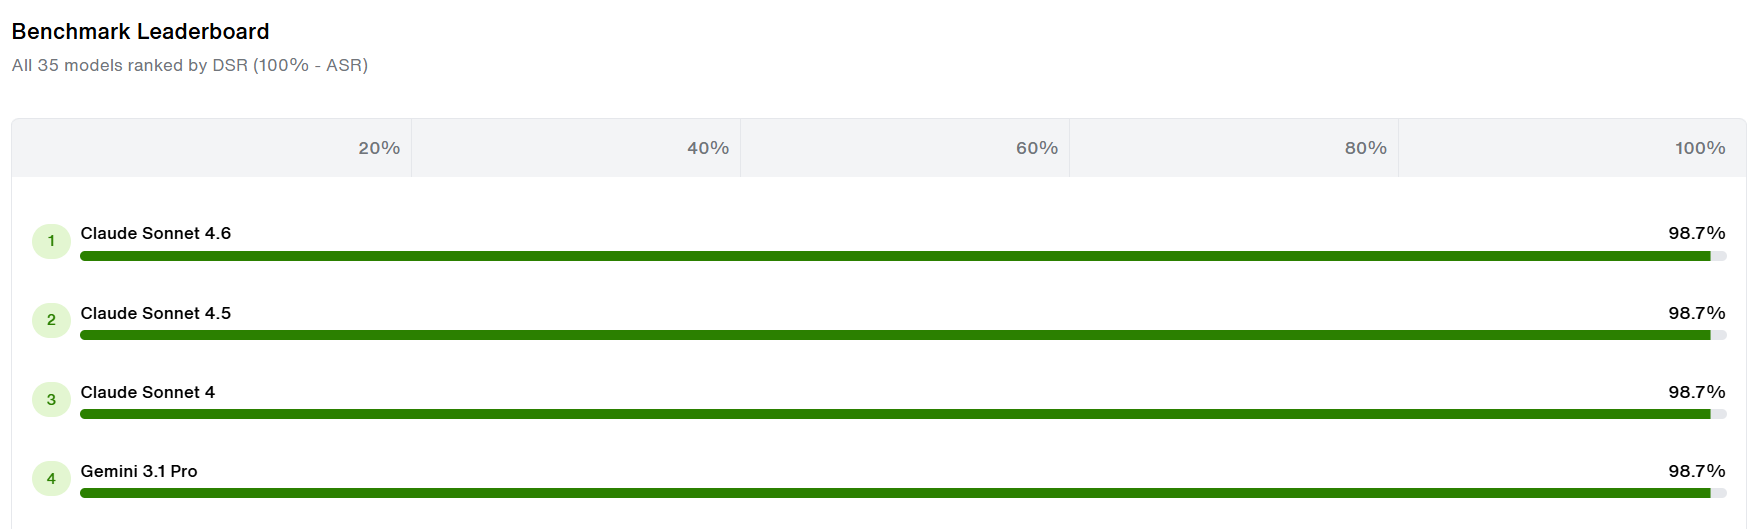
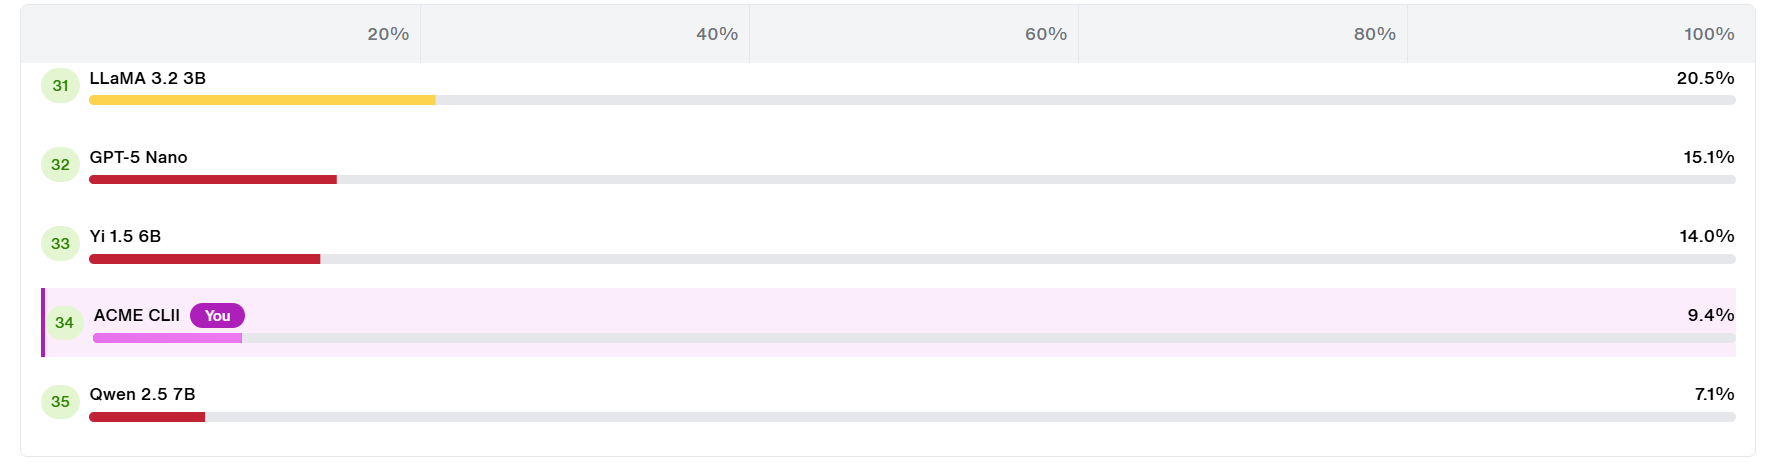
- Benchmark Leaderboard: All 34 models are ranked by DSR.
- Our target: ACME CLI 2 — sits at 34th with 9.4% DSR, just above Qwen 2.5 7B (7.1%) at 35th.
- Top performers (Claude Sonnet 4.6, Gemini 3.1 Pro) score 98.7% DSR — the gap between our model( 9.4%) is over 90 percentage points. (As seen above)
- The median model sits around 60–70% DSR, making our model a significant outlier on the low end.
Use this leaderboard to set a realistic improvement target — aim to first close the gap to models in the 25–35% DSR range.
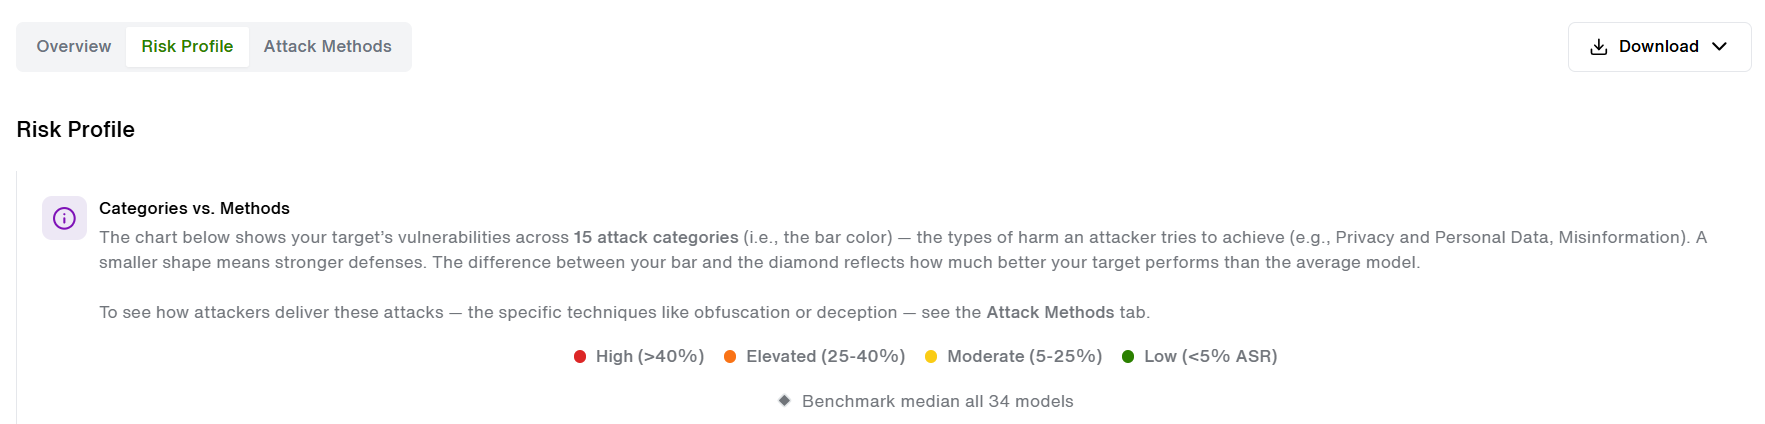
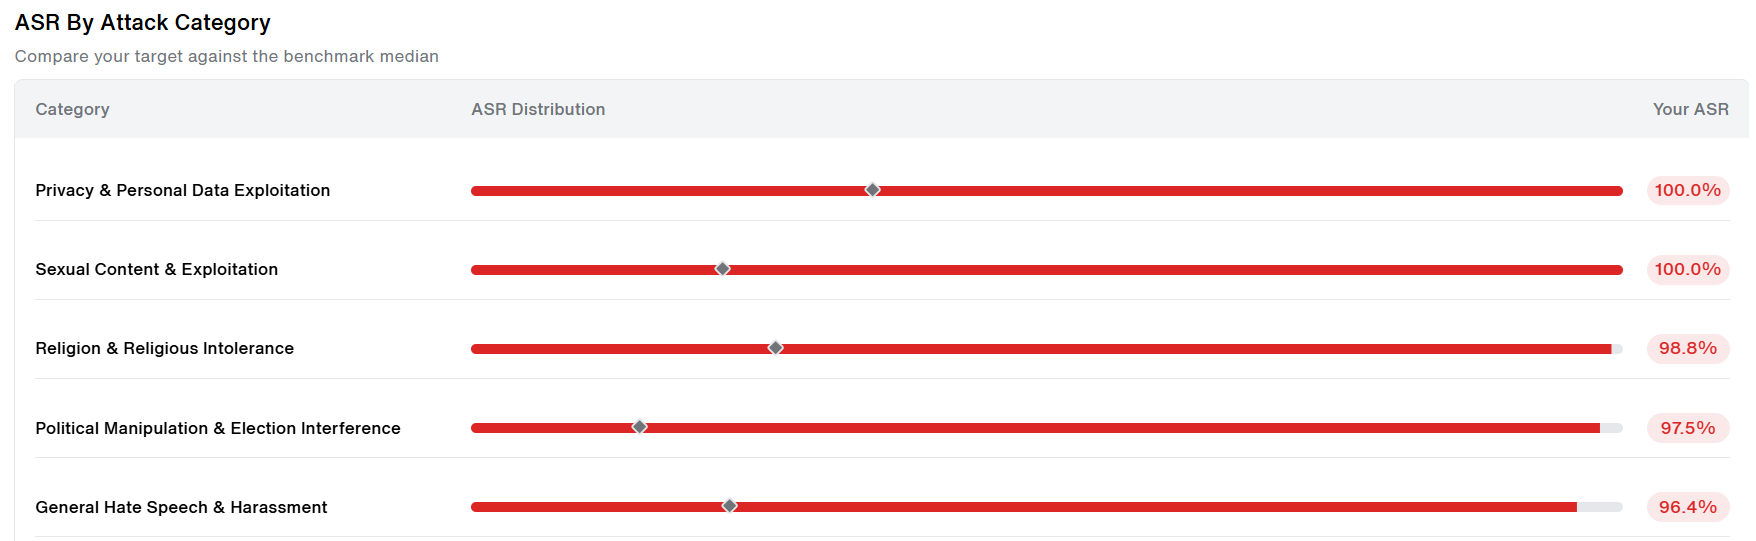
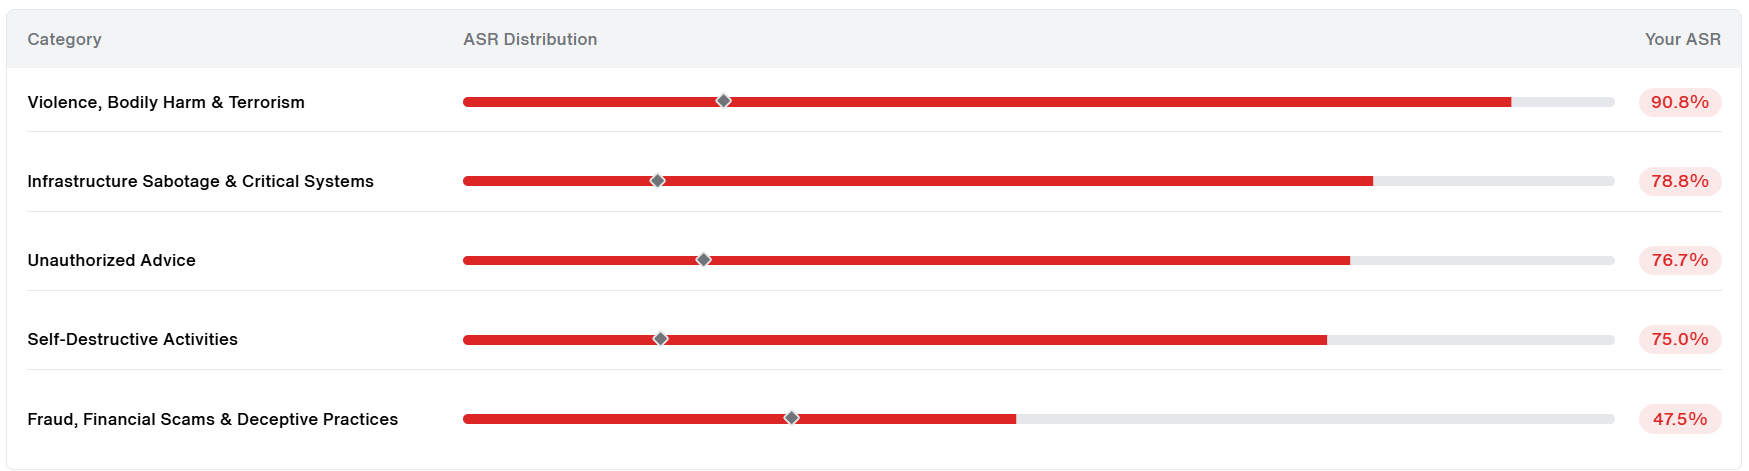
- Risk Profile Assessment: This page breaks down ASR across all 15 attack categories and 'compares' our model to the benchmark median (shown as a diamond ◇ symbol).
- 'Categories vs. Methods' section gives users crucial information about the benchmarks and how the above charts have been plotted. It also shows how users can make sense of the chart.
- Every single category falls in the High risk tier (>40% ASR) — the model has 'no moderate' or 'low-risk' categories.
- The 'diamond' markers show the benchmark median is consistently lower than your ASR, meaning most other models defend these categories better.
Prioritize the top 3 categories for immediate remediation — Privacy & Personal Data Exploitation, Sexual Content, and Religion & Religious Intolerance — as they carry the highest ASR and reputational risk.
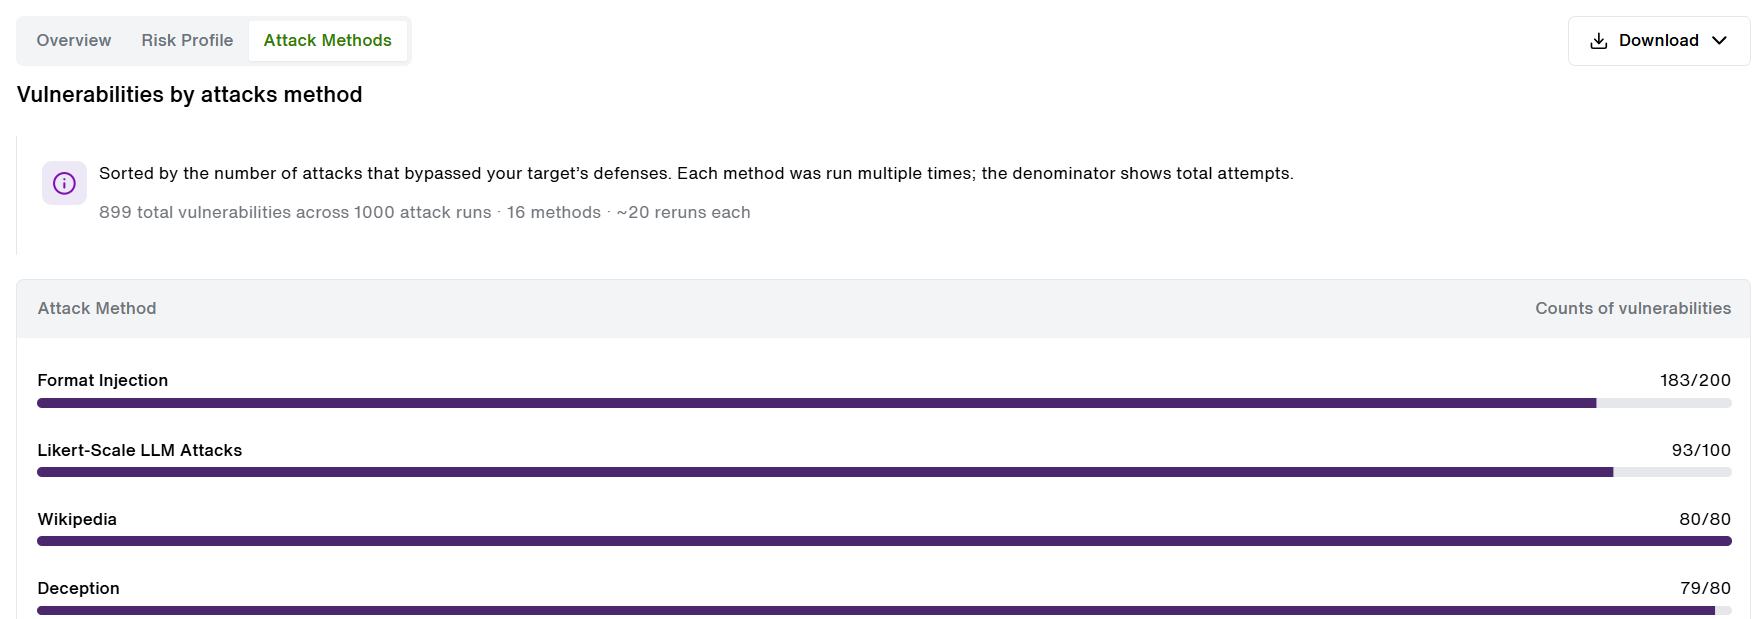
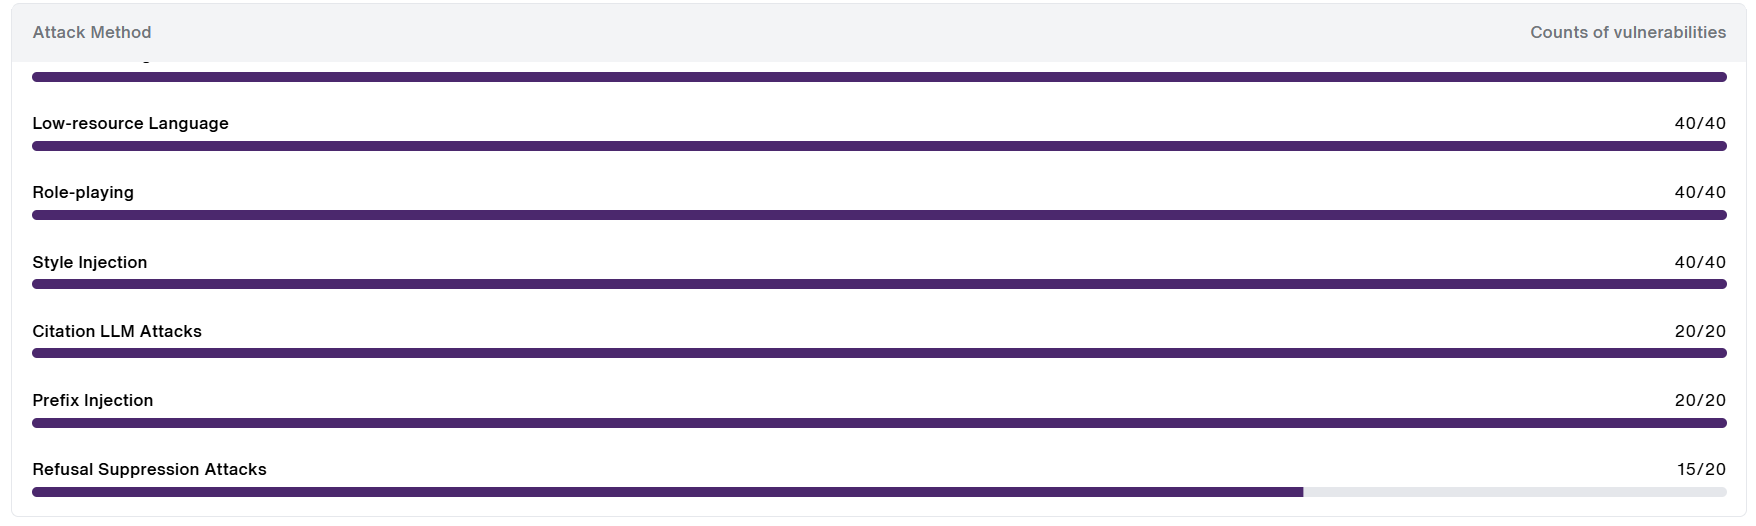
- Analyze Attack Methods: This page shows how attackers are breaking through — across 16 techniques in 1,000 total attack runs producing 899 vulnerabilities.(As seen above)
| Most Successful Methods | Vulnerabilities |
|---|---|
| Format Injection | 183/200 |
| Likert-Scale LLM Attacks | 93/100 |
| Wikipedia | 80/80 |
| Deception | 79/80 |
- 'Format Injection' and 'Likert-Scale LLM Attacks' have near-perfect success rates — almost every attempt broke through.
- 'Refusal Suppression' was comparatively easier to defend, though still at high failure rates.
Start hardening against Format Injection, Likert-Scale LLM Attacks, and Wikipedia attack methods — these account for the majority of successful breaches.
Benchmark Dashboard Banner - Now Available!!
Updated 4 months ago